Deploying LangGraph workflows to Databricks – A complete guide
Pragati GuptaMachine Learning Engineer, Solita
Published 11 Mar 2026
Reading time 8 min
We have been building advanced AI and agentic workflows with leading enterprises, including a major construction company. As part of this collaboration, our goal was to design scalable AI agents that could operate reliably within modern data platforms while integrating seamlessly with existing workflows.
Over the past year, our team has been working extensively with Databricks to build production-grade AI agents. The platform has proven to be a strong foundation: the tooling is robust, the documentation is comprehensive, and deploying agents using the OpenAI SDK is typically straightforward.
During one of our engagements, the customer approached us with a new requirement: migrate their existing LangGraph workflows to Databricks.
At first glance, this seemed like a simple task. Databricks supports LangGraph, and we expected the migration to be relatively quick. However, the reality was more complex.
What initially looked like a one-day task turned into a week-long deep dive across multiple documentation sources. Each resource was helpful in isolation, but none addressed the full picture:
The MLflow documentation explained agent interfaces, but it didn’t cover LangGraph-specific patterns.
The Databricks documentation included generic examples, but lacked real-world workflow migration scenarios.
The LangGraph documentation did not include guidance for deploying on Databricks.
Each documentation source assumed you were starting entirely within its ecosystem. Bridging that gap, figuring out how these pieces actually connect, became the real challenge.
We eventually identified a working pattern for integrating LangGraph workflows with Databricks in a way that is reliable and production-ready. That experience is what motivated us to share this article.
Our goal is simple: to help others avoid the same trial-and-error process and provide a clear path for deploying LangGraph workflows on Databricks.
The key concept: MLflow’s ResponsesAgent Interface
The critical component for making any LangGraph workflow compatible with Databricks is implementing the ResponsesAgent interface. This is the bridge between LangGraph and Databricks Model Serving.
What is ResponsesAgent?
ResponsesAgent is an MLflow interface specifically designed for conversational AI agents. It’s part of MLflow’s Agent Framework and defines a contract between your agent and Databricks Model Serving.
Think of it as an adapter: LangGraph workflows use nodes, edges, state updates, and checkpoints. Databricks Model Serving uses HTTP requests, JSON payloads, and streaming responses. The ResponsesAgent interface translates between these two worlds.
Implementing ResponsesAgent requires providing these two methods:
from mlflow.pyfunc import ResponsesAgent
from mlflow.types.responses import (
    ResponsesAgentRequest,
    ResponsesAgentResponse,
    ResponsesAgentStreamEvent
)
class SQLWorkflowOrchestrator(ResponsesAgent):
    def predict(self, request: ResponsesAgentRequest) -> ResponsesAgentResponse:
        """Synchronous prediction - returns results all at once"""
        # 1. Extract user input from request
        # 2. Run your LangGraph workflow
        # 3. Package results as ResponsesAgentResponse
        pass
    def predict_stream(self, request: ResponsesAgentRequest) -> Generator[ResponsesAgentStreamEvent]:
        """Streaming prediction - yields results progressively"""
        # 1. Extract user input from request
        # 2. Stream your LangGraph workflow execution
        # 3. Yield events as they happen
        pass
predict(): The synchronous version. The workflow runs to completion, then returns all results at once. Simple, but users wait for everything to finish.
predict_stream(): The streaming version. The workflow yields results as they happen,ideal for long running agents where showing progress matters. This powers real time updates in Databricks playgrounds.
The essential imports
These imports are required for proper integration:
from mlflow.pyfunc import ResponsesAgent
from mlflow.types.responses import (
    ResponsesAgentRequest,        # What you receive
    ResponsesAgentResponse,        # What predict() returns
    ResponsesAgentStreamEvent,     # What predict_stream() yields
    to_chat_completions_input,    # Convert request to messages
    output_to_responses_items_stream,  # Convert messages to events
)
The helper functions to_chat_completions_input() and output_to_responses_items_stream() handle conversion between Databricks formats and standard chat message formats, significantly simplifying implementation.
Architecture overview: The big picture
There are 6 essential components to it
Your LangGraph workflow: Your existing multi-agent system built with LangGraph — nodes, edges, state management, and conditional routing. This code doesn’t change for Databricks deployment. It remains pure LangGraph.
Orchestrator wrapper (ResponsesAgent): The adapter class that wraps your LangGraph workflow and implements the ResponsesAgent interface.
Agent script: A simple Python script that MLflow uses as the entry point when loading your model.
MLflow logging: The process of packaging all code, dependencies, and configurations into an MLflow artifact. This creates a self contained artifact with everything needed to run your workflow.
Unity catalog registration: Registering the MLflow artifact in Unity catalog for versioning and governance.
Model serving endpoint: A REST API endpoint that hosts your model and handles inference requests.
Project walkthrough
Before diving into deployment, let’s tour the repository. Understanding the layout makes everything else click into place.
You can follow along in the GitHub repo , all the code is there.
The beauty here: workflow code in __init__ stays pure LangGraph. All Databricks-specific logic (request extraction, response formatting, streaming) lives in predict_stream().
The workflow: sql_workflow
Standard LangGraph structure, graph_builder.py defines the graph, nodes/ contains implementations, state/ defines state. This code doesn’t know about Databricks. It’s pure workflow logic.
The deployment notebook
deploy-langgraph-to-databricks.ipynb automates the entire pipeline:
Configuration: Catalog, schema, model name, endpoint name
Agent script generation: Creates the entry point that imports the orchestrator
Model serving deployment: Spins up the REST endpoint
Testing: Validates everything works
The notebook generates sql_workflow_agent.py programmatically:
The deployment process
The deployment notebook automates everything from packaging to production. Here’s what happens under the hood.
The deployment notebook automates everything from packaging to production. Here’s what happens under the hood.
Step 1: Configuration
Set environment-specific values at the top of the notebook. These values get injected throughout the deployment process , into the agent script, model registration, and endpoint configuration.
The notebook creates sql_workflow_agent.py programmatically. This script becomes the entry point when MLflow loads the model. The configuration values get baked in at generation time.
agent_script_content = f'''
from sql_workflow.sql_workflow_databricks import SQLWorkflowOrchestrator
orchestrator = SQLWorkflowOrchestrator(model="{FOUNDATION_MODEL_NAME}")
import mlflow
mlflow.models.set_model(orchestrator)
'''
with open("sql_workflow_agent.py", "w") as f:
    f.write(agent_script_content)
Step 3: Log to MLFlow
This is where everything gets packaged. The resources parameter is critical. It tells Databricks which external endpoints and tools the model needs access to foundation models, function calling tools, and database connections. Without this, the deployed model won’t have the right permissions.
Note: If you want your agent to have access to Unity catalog tables, Vector Store or any other Databricks resource, this is where you give the access.
Takes the MLflow artifact and creates a versioned model entry.
Step 5: Deploy to model serving
Databricks spins up compute resources, loads the model (by running sql_workflow_agent.py), and exposes it as a REST API with authentication, rate limiting, and auto scaling.
Real world example: The SQL workflow agent
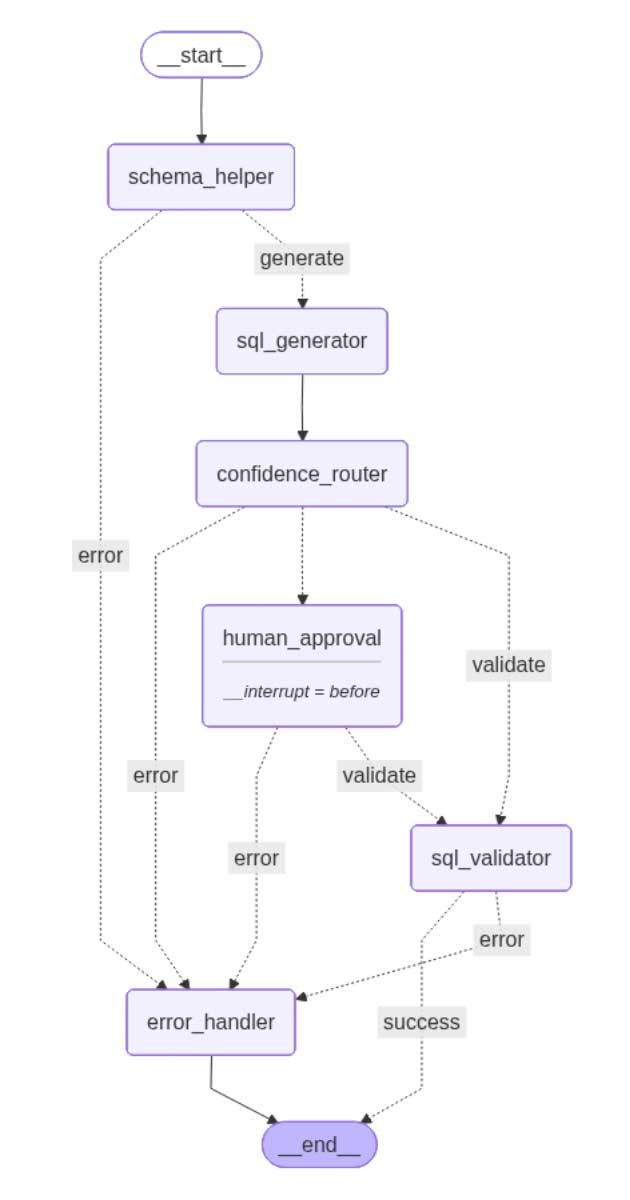
The repository includes a complete SQL generation workflow that demonstrates all the concepts in action. Here’s what it does:
The Task: Convert natural language questions into validated SQL queries.
Input: “Which customer placed the maximum orders in the last month?”
Output: A validated SQL query ready to execute.
The workflow demonstrates several production-ready patterns:
Confidence-based routing: The SQL generator scores its own confidence (0–100). High confidence queries (≥80%) go straight to validation. Low confidence queries pause for human review.
Human-in-the-loop: Uses LangGraph’s checkpointing with interrupt_before=[“human_approval”]. The workflow pauses when confidence is low, waits for human approval, then resumes.
Error handling with retry: If validation fails, the error handler sends the context back to the SQL generator for another attempt. Configurable max retries prevent infinite loops.
Streaming results: The orchestrator streams each node’s output as it completes and users see real-time progress: “Schema retrieved” → “SQL generated” → “Validation passed”.
Complete observability: MLflow tracing captures every node execution, LLM call, and state transition automatically.
See more in action
The video shows the deployed workflow in the Databricks playground. Watch how queries stream results in real time and how MLflow traces provide complete visibility into every step, from the initial request through each node execution, including LLM calls, state transitions, and the final response. The trace view makes debugging production issues straightforward: click on any node to see its inputs, outputs, and execution time.
Conclusion
Through our collaboration with a leading construction company, our team explored how existing LangGraph workflows can be deployed reliably within the Databricks ecosystem. What began as a simple migration turned into an opportunity to develop a practical and reusable deployment pattern.
The key enabler is the ResponsesAgent interface, which acts as the bridge between LangGraph workflows and Databricks Model Serving. By wrapping the workflow with this interface, the agent can be deployed without changing the core LangGraph logic.
The pattern is straightforward: build the workflow, wrap it with the orchestrator layer, and run the deployment notebook. The workflow code remains unchanged, and the deployment process can be reused across projects.
Clone the repository, update the configuration variables, and run the deployment notebook. The same pattern can be applied to any LangGraph workflow by replacing the example logic with your own.
This work reflects the strong collaboration between our customer and us, combining industry expertise with modern AI engineering practices to build scalable agentic workflows.